Last modified: May 28, 2010
Contents
1 - Summary
2 - Dependencies
3 - Cacti installation
4 - Services configuration
5 - View cacti website
6 - Services check
1 - Summary
This guide will show you how to install cacti in FreeBSD. Cacti is a frontend
to RRDTool which stores information needed to create graphs which also includes
SNMP support to create traffic graphs. In this guide, cacti will be served by
apache so information can be viewed in a web browser. This has been tested in
FreeBSD 8.0.
2 - Dependencies
Check to make sure that the following dependencies for apache are installed.
Apache is a web server that will host the cacti web pages.
# pkg_info | grep -iE '(autoconf-2.62|autoconf-wrapper)'
# pkg_info | grep -iE '(db42|expat|gdbm|libiconv|libtool|m4|pcre|perl)'
# sudo pkg_add -r mysql50-client
Password:
Install the apache22 port. Leave the defaults, but enable mysql and disable
IPV6.
[X] MYSQL Enable MySQL support for apr-dbd
[ ] IPV6 Enable IPv6 support
# cd /usr/ports/www/apache22/
# sudo make
Password:
# make install
Password:
# sudo make clean
Password:
# cd ~
Check to make sure that the following dependencies for php are installed.
# pkg_info | grep -iE '(libxml2|pkg-config)'
Install the php52 port. Leave the defaults, but enable apache and disable IPV6.
[X] APACHE Build Apache module
[ ] IPV6 Enable ipv6 support
# cd /usr/ports/lang/php52/
# sudo make
Password:
# make install
Password:
# sudo make clean
Password:
# cd ~
Configure apache to support php. Find where the apache daemon was installed to.
# pkg_info -L apache-2.2.* | grep sbin
/usr/local/sbin/ab
/usr/local/sbin/apachectl
/usr/local/sbin/apxs
/usr/local/sbin/checkgid
/usr/local/sbin/dbmmanage
/usr/local/sbin/envvars
/usr/local/sbin/htcacheclean
/usr/local/sbin/htdbm
/usr/local/sbin/htdigest
/usr/local/sbin/htpasswd
/usr/local/sbin/httpd
/usr/local/sbin/httxt2dbm
/usr/local/sbin/logresolve
/usr/local/sbin/rotatelogs
/usr/local/sbin/split-logfile
# pkg_info -L apache-2.2.* | grep rc.d
/usr/local/etc/rc.d/apache22
/usr/local/etc/rc.d/htcacheclean
Find where the apache configuration file is at.
# grep httpd.conf /usr/local/etc/rc.d/apache22 /usr/local/etc/rc.d/htcacheclean
/usr/local/etc/rc.d/apache22:required_files=/usr/local/etc/apache22/httpd.conf
/usr/local/etc/rc.d/htcacheclean:# your httpd.conf
# strings /usr/local/sbin/httpd | grep httpd.conf
-D SERVER_CONFIG_FILE="etc/apache22/httpd.conf"
etc/apache22/httpd.conf
directive in your httpd.conf file to list a non-root
You will need to modify the original configuration file. Add the following.
DirectoryIndex index.html index.php
AddType application/x-httpd-php .php
AddType application/x-httpd-php-source .phps
# sudo cp /usr/local/etc/apache22/httpd.conf /usr/local/etc/apache22/httpd.conf.example
Password:
# sudo vi /usr/local/etc/apache22/httpd.conf
Password:
Find the DocumentRoot for apache and create a small php index file.
# grep "DocumentRoot \"\" /usr/local/etc/apache22/httpd.conf
DocumentRoot "/usr/local/www/apache22/data"
# ls -1 /usr/local/www/apache22/data/*.html
index.html
# grep "DirectoryIndex " /usr/local/etc/apache22/httpd.conf
DirectoryIndex index.html index.php
# cd /usr/local/www/apache22/data/
# sudo mv index.html index.html.original
Password:
Create the following test file.
<? phpinfo(); ?>
# sudo vi index.php
Password:
Edit /etc/rc.conf.local so that the apache daemon will start when the system
starts up. Somewhere in the file add the following.
apache22_enable="YES"
# sudo vi /etc/rc.conf.local
Password:
# cd ~
Start the apache service.
# pkg_info -L apache-2.2.* | grep rc.d
/usr/local/etc/rc.d/apache22
/usr/local/etc/rc.d/htcacheclean
# sudo /usr/local/etc/rc.d/apache22 start
Password:
Performing sanity check on apache22 configuration:
Syntax OK
Starting apache22.
# sudo /usr/local/etc/rc.d/apache22 status
Password:
apache22 is running as pid 94509.
Install the mysql50-server package.
# sudo pkg_add -r mysql50-server
Password:
Edit /etc/rc.conf.local so that the mysql daemon will start when the system
starts up. Somewhere in the file add the following.
mysql_enable="YES"
# sudo vi /etc/rc.conf.local
Password:
# cd ~
Start the mysql service.
# pkg_info -L mysql-server-5.0.* | grep rc.d
/usr/local/etc/rc.d/mysql-server
# sudo /usr/local/etc/rc.d/mysql-server start
Password:
Starting mysql.
# sudo /usr/local/etc/rc.d/mysql-server status
Password:
mysql is running as pid 94605.
Install the net-snmp package.
# sudo pkg_add -r net-snmp
Password:
3 - Cacti installation
Install the cacti package.
# sudo pkg_add -r cacti
Password:
4 - Services configuration
Find where the cacti website directory was installed to.
# pkg_info -L cacti-* | grep index.php
/usr/local/share/cacti/index.php
Add the following to the apache config file.
<Directory /usr/local/share/cacti>
AllowOverride None
Order Allow,Deny
Allow from all
</Directory>
Alias /cacti /usr/local/share/cacti
# sudo vi /usr/local/etc/apache22/httpd.conf
Password:
Configure mysql for cacti by doing the following.
# su - root
Password:
# /usr/local/bin/mysqladmin --user=root create cacti
# echo "GRANT ALL ON cacti.* TO cacti@localhost IDENTIFIED BY '********'; \
FLUSH PRIVILEGES;" | /usr/local/bin/mysql
# pkg_info -L cacti-* | grep cacti.sql
/usr/local/share/cacti/cacti.sql
# /usr/local/bin/mysql cacti < /usr/local/share/cacti/cacti.sql
# logout
Modify the cacti config file to have the following.
$database_type = "mysql";
$database_default = "cacti";
$database_hostname = "localhost";
$database_username = "cacti";
$database_password = "********";
$database_port = "3306";
# pkg_info -L cacti-* | grep config.php
/usr/local/share/cacti/include/config.php.orig
# cd /usr/local/share/cacti/include/
# sudo cp config.php.orig config.php
Password:
# sudo cp config.php config.php.example
Password:
# cd ~
# sudo vi /usr/local/share/cacti/include/config.php
Password:
# sudo touch /var/log/cacti.log
Password:
Restart the apache and mysql services. Also, make sure that if you have
firewall software on the server to allow tcp port 80 traffic in.
# sudo /usr/local/etc/rc.d/apache22 restart
Password:
Performing sanity check on apache22 configuration:
Syntax OK
Stopping apache22.
Waiting for PIDS: 94509.
Performing sanity check on apache22 configuration:
Syntax OK
Starting apache22.
# sudo /usr/local/etc/rc.d/mysql-server restart
Password:
Stopping mysql.
Waiting for PIDS: 94605.
Starting mysql.
5 - View cacti website
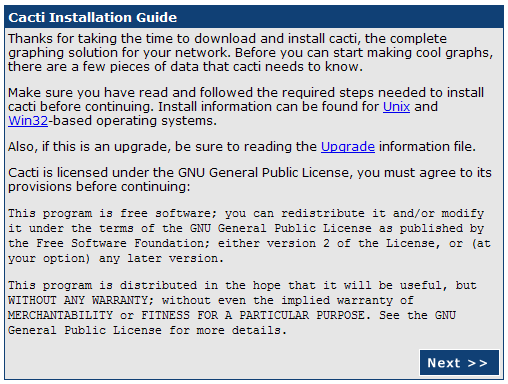
Navigate your web browser to http://server.test.com/cacti/. This will take you
to a page that says Cacti Installation Guide. Click on Next.
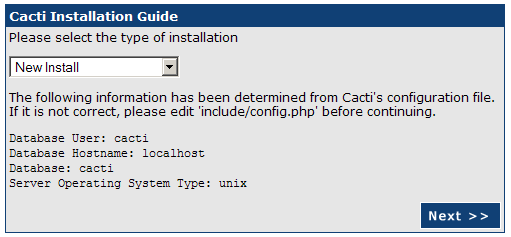
 Select New Install on the next page and click on Next.
 On this page keep the defaults except for the path to the log file. Change
this to /var/log/cacti.log.
On this page keep the defaults except for the path to the log file. Change
this to /var/log/cacti.log.
 Click on Finish.
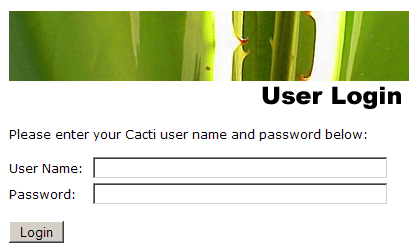
Log in using the following account information.
User Name: admin
Password: admin
Click on Finish.
Log in using the following account information.
User Name: admin
Password: admin
 After logging in the first time you will be forced to change the password.
After adding some devices, you will need to create the following cron job.
*/5 * * * * cacti /usr/local/bin/php \
/usr/local/share/cacti/poller.php > /dev/null 2>&1
# su - root
Password:
# vi /etc/crontab
6 - Services check
Reboot your computer. Log in like normal and check to see that the apache
and mysql services are running. That's it, now you have cacti running in
FreeBSD.
# sudo shutdown -r now
Password:
# sudo /usr/local/etc/rc.d/apache22 status
Password:
apache22 is running as pid 886.
# sudo /usr/local/etc/rc.d/mysql-server status
Password:
mysql is running as pid 872.
After logging in the first time you will be forced to change the password.
After adding some devices, you will need to create the following cron job.
*/5 * * * * cacti /usr/local/bin/php \
/usr/local/share/cacti/poller.php > /dev/null 2>&1
# su - root
Password:
# vi /etc/crontab
6 - Services check
Reboot your computer. Log in like normal and check to see that the apache
and mysql services are running. That's it, now you have cacti running in
FreeBSD.
# sudo shutdown -r now
Password:
# sudo /usr/local/etc/rc.d/apache22 status
Password:
apache22 is running as pid 886.
# sudo /usr/local/etc/rc.d/mysql-server status
Password:
mysql is running as pid 872.
|
