Last modified: Sept. 6, 2011
Contents
1 - Summary
2 - Dependencies
3 - Zabbix server installation
4 - Service configuration
5 - View status on website
6 - Service check
1 - Summary
This guide will show you how to install the Zabbix Server in Red Hat Enterprise
Linux. The Zabbix Server is the server software that installs on a server and
receives information from network devices. Zabbix is an open source monitoring
solution. This has been tested in Red Hat Enterprise Linux x86_64.
2 - Dependencies
Add the EPEL repository. This repository contains extra packages from Red Hat.
# wget http://download.fedora.redhat.com/pub/epel/$rel/$arch/epel-release-$ver.noarch.rpm
# sudo rpm -ivh epel-release-$ver.noarch.rpm
[sudo] password for user:
# rm -f epel-release-$ver.noarch.rpm
Install the apache package. Apache is a web server that will host the web pages
that display the server data.
# sudo yum install httpd.x86_64
[sudo] password for user:
Find where the apache daemon was installed to.
# rpm -ql httpd-* | grep sbin
/usr/sbin/apachectl
/usr/sbin/htcacheclean
/usr/sbin/httpd
/usr/sbin/httpd.event
/usr/sbin/httpd.worker
/usr/sbin/httxt2dbm
/usr/sbin/rotatelogs
/usr/sbin/suexec
Enable the apache service so that it will start when the system starts up.
# sudo /sbin/chkconfig httpd on
[sudo] password for user:
# sudo /sbin/chkconfig --list httpd
[sudo] password for user:
httpd 0:off 1:off 2:on 3:on 4:on 5:on 6:off
Find where the configuration file should be put.
# rpm -ql httpd-* | grep init.d
/etc/rc.d/init.d/httpd
# grep httpd.conf /etc/rc.d/init.d/httpd
# config: /etc/httpd/conf/httpd.conf
CONFFILE=/etc/httpd/conf/httpd.conf
# strings /usr/sbin/httpd | grep httpd.conf
-D SERVER_CONFIG_FILE="conf/httpd.conf"
conf/httpd.conf
directive in your httpd.conf file to list a non-root
You will need to modify the original configuration file. Add the following. In
this example, I set the websites to be stored in an alernate directory. By the
way, there is already a group named it which includes an account for the web
developers.
ServerName server.test.com
DocumentRoot "/data/websites/test/server"
ErrorLog syslog
LogFormat "%v:%p %h %l %u %t \"%r\" %>s %b \"%{Referer}i\" \"%{User-Agent}i\"" commonvhost
CustomLog "|/usr/bin/logger" commonvhost
#Alias /icons/ "/var/www/icons/"
#<Directory "/var/www/icons">
# Options Indexes MultiViews
# AllowOverride None
# Order allow,deny
# Allow from all
#</Directory>
#ScriptAlias /cgi-bin/ "/var/www/cgi-bin/"
#<Directory "/var/www/cgi-bin">
# AllowOverride None
# Options None
# Order allow,deny
# Allow from all
#</Directory>
#Alias /error/ "/var/www/error/"
ErrorDocument 404 /index.html
NameVirtualHost *:80
NameVirtualHost *:443
<VirtualHost *:80>
ServerName server.test.com
Redirect / https://server.test.com/
</VirtualHost>
<VirtualHost *:443>
ServerName server.test.com
ServerAdmin root@localhost
DocumentRoot /data/websites/test/server
</VirtualHost>
# rpm -ql httpd-* | grep "httpd\.conf"
/etc/httpd/conf/httpd.conf
# sudo cp /etc/httpd/conf/httpd.conf /etc/httpd/conf/httpd.conf.example
[sudo] password for user:
# sudo vi /etc/httpd/conf/httpd.conf
[sudo] password for user:
# sudo mkdir -p /data/websites/test/server
[sudo] password for user:
# sudo mkdir -p /data/logs/httpd
[sudo] password for user:
# sudo chown -R root:it /data/logs/httpd/
[sudo] password for user:
Install the mod_ssl package for SSL certificate support. Copy in the SSL
certificate files to /etc/httpd/ssl/.
# sudo yum install mod_ssl.x86_64
[sudo] password for user:
# sudo mkdir /etc/httpd/ssl/
[sudo] password for user:
You will need to modify the original configuration file. Add the following.
#SSLPassPhraseDialog builtin
ErrorLog syslog
SSLCertificateFile /etc/httpd/ssl/test.cer
SSLCertificateKeyFile /etc/httpd/ssl/test.key.alt
SSLCertificateChainFile /etc/httpd/ssl/test.crt
# rpm -ql mod_ssl-* | grep conf.d
/etc/httpd/conf.d/ssl.conf
# sudo cp /etc/httpd/conf.d/ssl.conf /etc/httpd/conf.d/ssl.conf.example
[sudo] password for user:
# sudo vi /etc/httpd/conf.d/ssl.conf
[sudo] password for user:
Create an index file.
<html>
<head>
<title>Test: Network monitoring</title>
</head>
<body>
<a href="https://server.test.com/zabbix/">Server information - Zabbix</a><br>
</body>
</html>
# sudo vi /data/websites/test/server/index.html
[sudo] password for user:
Configure syslog appropriately.
Install the php package.
# sudo yum install php.x86_64
[sudo] password for user:
# sudo rpm -ql php-common-* | grep php.ini
/etc/php.ini
# sudo cp /etc/php.ini /etc/php.ini.example
[sudo] password for user:
You will need to modify the original configuration file. Have the following.
You can find a list of the supported timezones at this page. By the way, there
is already a group named it which includes an account for the web developers.
http://us.php.net/manual/en/timezones.php
max_execution_time = 600 ; Maximum execution time of each script, in seconds
max_input_time = 600 ; Maximum amount of time each script may spend parsing request data
memory_limit = 256M ; Maximum amount of memory a script may consume
error_reporting = E_ALL & ~E_NOTICE
log_errors_max_len = 0
error_log = /data/logs/php/errors.log
post_max_size = 32M
upload_max_filesize = 16M
date.timezone = timezone
mbstring.func_overload = 2
# sudo vi /etc/php.ini
[sudo] password for user:
# sudo mkdir /data/logs/php
[sudo] password for user:
# sudo touch /data/logs/php/errors.log
[sudo] password for user:
# sudo chown -R root:it /data/logs/php/
[sudo] password for user:
# sudo chmod -R 777 /data/logs/php/
[sudo] password for user:
Install the mysql-server package. MySQL is a database server that will store
the information the Zabbix Agents send from the network devices.
# sudo yum install mysql-server.x86_64
[sudo] password for user:
Find where the mysql daemon was installed to.
# rpm -ql mysql-server-* | grep mysqld
/etc/rc.d/init.d/mysqld
/usr/bin/mysqld_multi
/usr/bin/mysqld_safe
/usr/bin/mysqldumpslow
/usr/libexec/mysqld
/usr/share/man/man1/mysqld_multi.1.gz
/usr/share/man/man1/mysqld_safe.1.gz
/usr/share/man/man1/mysqldumpslow.1.gz
/usr/share/man/man1/safe_mysqld.1.gz
/usr/share/man/man8/mysqld.8.gz
/var/log/mysqld.log
/var/run/mysqld
Enable the mysql service so that it will start when the system starts up.
# sudo /sbin/chkconfig mysqld on
[sudo] password for user:
# sudo /sbin/chkconfig --list mysqld
[sudo] password for user:
mysqld 0:off 1:off 2:on 3:on 4:on 5:on 6:off
Find where the configuration file should be put.
# rpm -ql mysql-server -* | grep init.d
/etc/rc.d/init.d/mysqld
# grep my.cnf /etc/rc.d/init.d/mysqld
# config: /etc/my.cnf
# strings /usr/libexec/mysqld | grep my.cnf
Port number to use for connection or 0 for default to, in order of preference,
my.cnf, $MYSQL_TCP_PORT, /etc/services, built-in default (3306).
InnoDB: in my.cnf, but AWE can only be used in Windows 2000 and later.
InnoDB: you should now edit innodb_data_file_path in my.cnf back
InnoDB: missing. Have you edited innodb_data_file_path in my.cnf in an
InnoDB: You can set innodb_force_recovery=1 in my.cnf to force
InnoDB: my.cnf and restart the database.
InnoDB: mysqld and edit my.cnf so that newraw is replaced
InnoDB: You can try to recover the database with the my.cnf
InnoDB: AWE: Error: you must specify in my.cnf .._awe_mem_mb larger
InnoDB: To get mysqld to start up, set innodb_thread_concurrency in my.cnf
InnoDB: your my.cnf matches the ibdata files that you have in the
InnoDB: my.cnf! Remember that InnoDB keeps all log files and all system
InnoDB: my.cnf.
InnoDB: the .ibd file, you can set innodb_force_recovery > 0 in my.cnf
InnoDB: the .ibd file, you can set innodb_force_recovery > 0 in my.cnf
You will need to modify the original configuration file. Have the following. In
this example, I set the databases to be stored in an alternate directory using
MyISAM. By the way, there is already a group named it which includes an account
for the web developers.
[client]
socket = /data/databases/mysql/mysql.sock
[mysqld]
datadir = /data/databases/mysql
log-bin = /data/databases/log_mysql/binlog
log-error = /data/logs/mysqld/errors.log
log-slow-queries = /data/logs/mysqld/slow-query.log
skip-innodb
socket = /data/databases/mysql/mysql.sock
user = mysql
# ls -l /etc/my.cnf
/etc/my.cnf
# sudo cp /etc/my.cnf /etc/my.cnf.example
[sudo] password for user:
# sudo vi /etc/my.cnf
[sudo] password for user:
# sudo mkdir /data/databases
[sudo] password for user:
# sudo mkdir /data/logs/mysqld
[sudo] password for user:
# sudo touch /data/logs/mysqld/errors.log
[sudo] password for user:
# sudo touch /data/logs/mysqld/slow-query.log
[sudo] password for user:
# sudo chown -R root:it /data/logs/
[sudo] password for user:
# sudo chmod -R 777 /data/logs/mysqld/
[sudo] password for user:
# sudo /usr/sbin/usermod -d /data/databases/mysql mysql
[sudo] password for user:
# cd /var/lib/
# sudo rm -fr mysql/
[sudo] password for user:
# sudo ln -s /data/databases/mysql mysql
[sudo] password for user:
# cd ~
Modify the following in the mysqld startup script.
get_mysql_option mysqld datadir "/data/databases/mysql"
get_mysql_option mysqld_safe log-error "/data/logs/mysqld/errors.log"
# sudo cp /etc/rc.d/init.d/mysqld /etc/rc.d/init.d/mysqld.original
[sudo] password for user:
# sudo vi /etc/rc.d/init.d/mysqld
[sudo] password for user:
Start the mysql service.
# sudo /sbin/service mysqld start
[sudo] password for user:
Initializing MySQL database: Installing MySQL system tables...
OK
Filling help tables...
OK
To start mysqld at boot time you have to copy
support-files/mysql.server to the right place for your system
PLEASE REMEMBER TO SET A PASSWORD FOR THE MySQL root USER !
To do so, start the server, then issue the following commands:
/usr/bin/mysqladmin -u root password 'new-password'
/usr/bin/mysqladmin -u root -h server.test.com password 'new-password'
Alternatively you can run:
/usr/bin/mysql_secure_installation
which will also give you the option of removing the test
databases and anonymous user created by default. This is
strongly recommended for production servers.
See the manual for more instructions.
You can start the MySQL daemon with:
cd /usr ; /usr/bin/mysqld_safe &
You can test the MySQL daemon with mysql-test-run.pl
cd mysql-test ; perl mysql-test-run.pl
Please report any problems with the /usr/bin/mysqlbug script!
The latest information about MySQL is available on the web at
http://www.mysql.com
Support MySQL by buying support/licenses at http://shop.mysql.com
[ OK ]
Starting MySQL: [ OK ]
# sudo /usr/bin/mysqladmin -u root password 'password'
[sudo] password for user:
# sudo /usr/bin/mysqladmin -u root -h server.test.com password 'password'
[sudo] password for user:
# mysql -u root -p
Enter password:
Welcome to the MySQL monitor. Commands end with ; or \g.
Your MySQL connection id is 2
Server version: *-log Source distribution
Type 'help;' or '\h' for help. Type '\c' to clear the buffer.
mysql> create database zabbix character set utf8;
Query OK, 1 row affected (0.00 sec)
mysql> create user 'zabbix'@'localhost' identified by 'password';
Query OK, 0 rows affected (0.04 sec)
mysql> grant all on zabbix.* to zabbix;
Query OK, 0 rows affected (0.00 sec)
mysql> flush privileges;
Query OK, 0 rows affected (0.00 sec)
mysql> quit
Bye
Install the following php packages.
# sudo yum install php-gd.x86_64
[sudo] password for user:
# sudo yum install php-bcmath.x86_64
[sudo] password for user:
# sudo yum install php-xml.x86_64
[sudo] password for user:
# sudo yum install php-mbstring.x86_64
[sudo] password for user:
# sudo yum install php-mysql.x86_64
[sudo] password for user:
Install the following packages needed for zabbix.
# sudo yum install fping.x86_64
[sudo] password for user:
# sudo yum install iksemel.x86_64
[sudo] password for user:
# sudo yum install unixODBC.x86_64
[sudo] password for user:
3 - Zabbix server installation
Download and install the zabbix packges. They can be found at the following
website: http://fedora.danny.cz/danny-el/.
# mkdir zabbix
# cd zabbix/
# wget wget http://fedora.danny.cz/danny-el/5/$arch/zabbix-$ver.$rel.$arch.rpm
# sudo rpm -ivh zabbix-$ver.$rel.$arch.rpm
[sudo] password for user:
# wget http://fedora.danny.cz/danny-el/5/$arch/zabbix-server-$ver.$rel.$arch.rpm
# sudo rpm -ivh --nodeps zabbix-server-$ver.$rel.$arch.rpm
[sudo] password for user:
# wget http://fedora.danny.cz/danny-el/5/$arch/zabbix-server-mysql-$ver.$rel.$arch.rpm
# sudo rpm -ivh zabbix-server-mysql-$ver.$rel.$arch.rpm
[sudo] password for user:
# wget http://fedora.danny.cz/danny-el/5/$arch/zabbix-docs-$ver.$rel.$arch.rpm
# sudo rpm -ivh zabbix-docs-$ver.$rel.$arch.rpm
[sudo] password for user:
# wget http://fedora.danny.cz/danny-el/5/$arch/zabbix-web-$ver.$rel.$arch.rpm
# sudo rpm -ivh --nodeps zabbix-web-$ver.$rel.$arch.rpm
[sudo] password for user:
# wget http://fedora.danny.cz/danny-el/5/$arch/zabbix-web-mysql-$ver.$rel.$arch.rpm
# sudo rpm -ivh zabbix-web-mysql-$ver.$rel.$arch.rpm
[sudo] password for user:
4 - Service configuration
Find where the zabbix daemon was installed to.
# rpm -ql zabbix-server-mysql-* | grep sbin
/usr/sbin/zabbix_server_mysql
Enable the zabbix service so that it will start when the system starts up.
# sudo /sbin/chkconfig zabbix-server on
[sudo] password for user:
# sudo /sbin/chkconfig --list zabbix-server
[sudo] password for user:
zabbix-server 0:off 1:off 2:on 3:on 4:on 5:on 6:off
Find where the configuration file should be put.
# rpm -ql zabbix-server-* | grep init.d
/etc/init.d/zabbix-server
# grep zabbix_server.conf /etc//init.d/zabbix-server
# config: /etc/zabbix/zabbix_server.conf
# strings /usr/sbin/zabbix_server_mysql | grep zabbix_server.conf
/etc/zabbix/zabbix_server.conf
You will need to modify the original configuration file. Have the following.
ListenPort=10051
LogFile=/data/logs/zabbix/zabbix_server.log
LogFileSize=0
PidFile=/var/run/zabbix/zabbix.pid
DBName=zabbix
DBUser=zabbix
DBPassword=password
DBSocket=/data/databases/mysql/mysql.sock
DBPort=3306
ListenIP=0.0.0.0
AlertScriptsPath=/etc/zabbix/alertscripts/
FpingLocation=/usr/sbin/fping
# rpm -ql zabbix-server-* | grep zabbix_server.conf
/etc/zabbix/zabbix_server.conf
# sudo cp /etc/zabbix/zabbix_server.conf /etc/zabbix/zabbix_server.conf.example
[sudo] password for user:
# sudo vi /etc/zabbix/zabbix_server.conf
[sudo] password for user:
# sudo mkdir /etc/zabbix/alertscripts
[sudo] password for user:
# sudo mkdir /data/logs/zabbix
[sudo] password for user:
# sudo chown -R root:it /data/logs/zabbix/
[sudo] password for user:
You will need to modify the original configuration file for zabbix used by
apache. Have the following changes.
Alias /zabbix/ "/data/websites/test/server/zabbix/"
<Directory "/data/websites/test/server/zabbix">
<Directory "/data/websites/test/server/zabbix/include">
<Directory "/data/websites/test/server/zabbix/include/classes">
# rpm -ql zabbix-web-* | grep conf.d
/etc/httpd/conf.d/zabbix.conf
# sudp cp /etc/httpd/conf.d/zabbix.conf /etc/httpd/conf.d/zabbix.conf.example
[sudo] password for user:
# sudo vi /etc/httpd/conf.d/zabbix.conf
[sudo] password for user:
Copy the zabbix web directory and set ownership and permissions. By the way,
there is already a group named it which includes an account for the web
developers.
# grep "\<Directory" /etc/httpd/conf.d/zabbix.conf.example
<Directory "/usr/share/zabbix">
<Directory "/usr/share/zabbix/include">
<Directory "/usr/share/zabbix/include/classes">
# sudo cp -Rp /usr/share/zabbix/ /data/websites/test/server/zabbix/
[sudo] password for user:
# sudo rm -f /data/websites/test/server/zabbix/conf/zabbix.conf.php.example
[sudo] password for user:
# sudo chown -R apache:it /data/websites/test/server/zabbix/
[sudo] password for user:
# sudo chmod -R 774 /data/websites/test/server/zabbix/
[sudo] password for user:
You will need to modify the original php configuration file. Have the
following.
<?php
// Zabbix GUI configuration file
global $DB;
$DB["TYPE"] = 'MYSQL';
$DB["SERVER"] = 'localhost';
$DB["PORT"] = '0';
$DB["DATABASE"] = 'zabbix';
$DB["USER"] = 'zabbix';
$DB["PASSWORD"] = 'password';
$ZBX_SERVER = 'localhost';
$ZBX_SERVER_PORT = '10051';
$ZBX_SERVER_NAME = '';
$IMAGE_FORMAT_DEFAULT = IMAGE_FORMAT_PNG;
?>
# rpm -ql zabbix-web-* | grep config.inc.php
/usr/share/zabbix/include/config.inc.php
/usr/share/zabbix/include/config.inc.php.orig
# grep zabbix.conf.php /usr/share/zabbix/include/config.inc.php
$ZBX_CONFIGURATION_FILE = '/etc/zabbix/web/zabbix.conf.php';
# sudo cp /usr/share/zabbix/conf/zabbix.conf.php.example /etc/zabbix/web/zabbix.conf.php
[sudo] password for user:
# sudo vi /etc/zabbix/web/zabbix.conf.php
[sudo] password for user:
# sudo chown -R apache:it /etc/zabbix/web/
[sudo] password for user:
# sudo chmod -R 774 /etc/zabbix/web/
[sudo] password for user:
Find the SQL statement files and insert them.
# rpm -ql zabbix-server-mysql-* | grep "\.sql" | grep create
/usr/share/doc/zabbix-server-mysql-*/create/data/data.sql
/usr/share/doc/zabbix-server-mysql-*/create/data/images_mysql.sql
/usr/share/doc/zabbix-server-mysql-*/create/schema/mysql.sql
# cat /usr/share/doc/zabbix-server-mysql-*/create/schema/mysql.sql | mysql -u zabbix -p zabbix
Enter password:
# cat /usr/share/doc/zabbix-server-mysql-*/create/data/data.sql | mysql -u zabbix -p zabbix
Enter password:
# cat /usr/share/doc/zabbix-server-mysql-*/create/data/images_mysql.sql | mysql -u zabbix -p zabbix
Enter password:
You will need to configure SELinux appropriately. SELinux status can be
found by running sestatus.
# sudo /usr/sbin/sestatus | grep status:
[sudo] password for user:
SELinux status: enabled
Before starting the services, make sure that tcp ports 80, 443 and 10051 are
open in case you are running firewall software. Here are some sample rules.
-A RH-Firewall-1-INPUT -m state --state NEW -m tcp -p tcp --dport 80 -j ACCEPT
-A RH-Firewall-1-INPUT -m state --state NEW -m tcp -p tcp --dport 443 -j ACCEPT
-A RH-Firewall-1-INPUT -m state --state NEW -m tcp -p tcp --dport 10051 -j ACCEPT
# sudo /sbin/service iptables stop
[sudo] password for user:
Flushing firewall rules: [ OK ]
Setting chains to policy ACCEPT: filter [ OK ]
Unloading iptables modules: [ OK ]
# sudo cp /etc/sysconfig/iptables /etc/sysconfig/iptables.previous
[sudo] password for user:
# sudo vi /etc/sysconfig/iptables
[sudo] password for user:
# sudo /sbin/service iptables start
[sudo] password for user:
Applying iptables firewall rules: [ OK ]
Loading additional iptables modules: ip_conntrack_netbios_n[ OK ]
Start the apache service.
# sudo /sbin/service httpd start
[sudo] password for user:
Starting httpd: [ OK ]
Start the zabbix service.
# sudo /sbin/service zabbix-server start
[sudo] password for user:
Starting ZABBIX server: [ OK ]
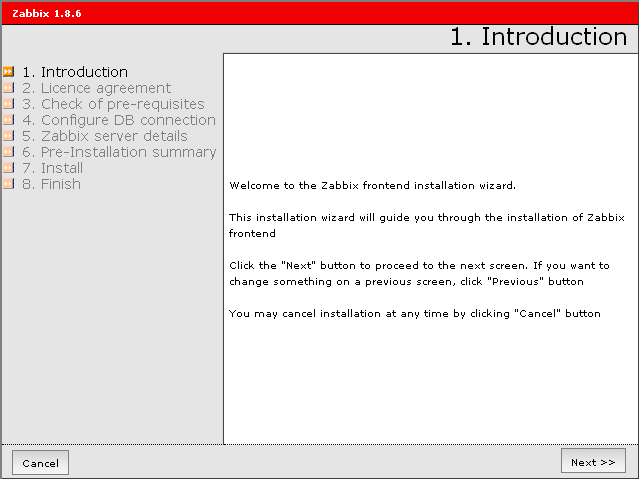
Navigate your web browser to https://server.test.com/zabbix/. You will see the
following screen. This is a wizard that installs the web frontend. Click on
Next.
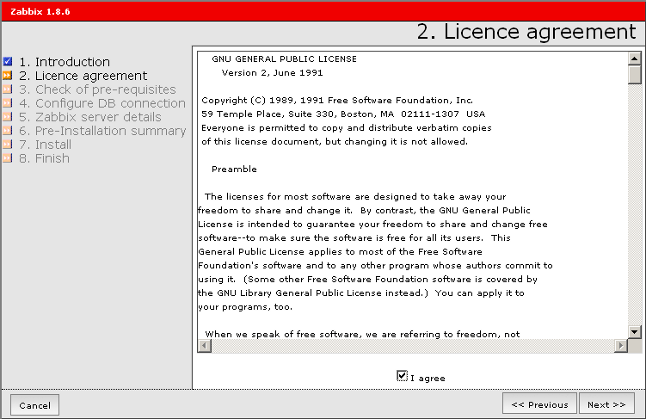
 The next screen shows the license agreement. Click on I agree and then click on
Next.
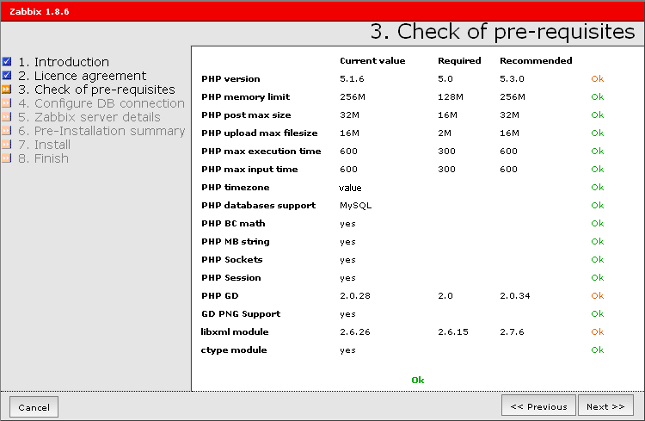
 The next screen shows the check of pre-requisites. Click on Next.
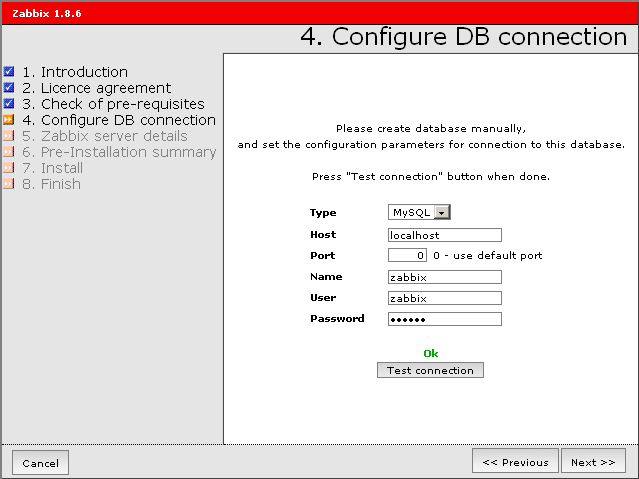
 The next screen shows the configuration for the database connection. You will
need to type in the zabbix database name, zabbix database username and zabbix
database password and then click on "Test connection." After that says OK,
click on Next.
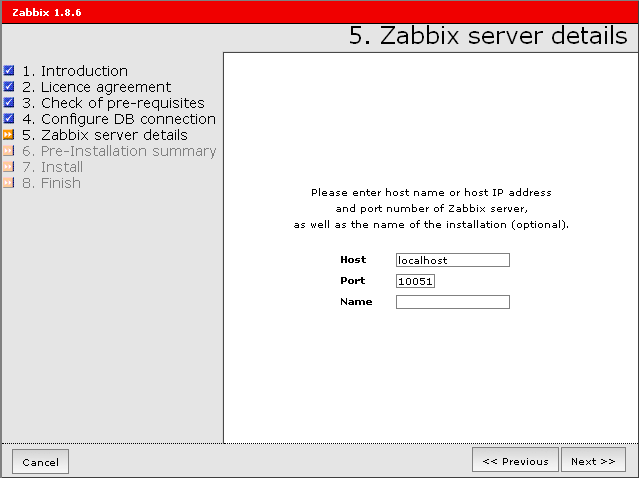
 The next screen shows the zabbix server information. You can just click on
Next.
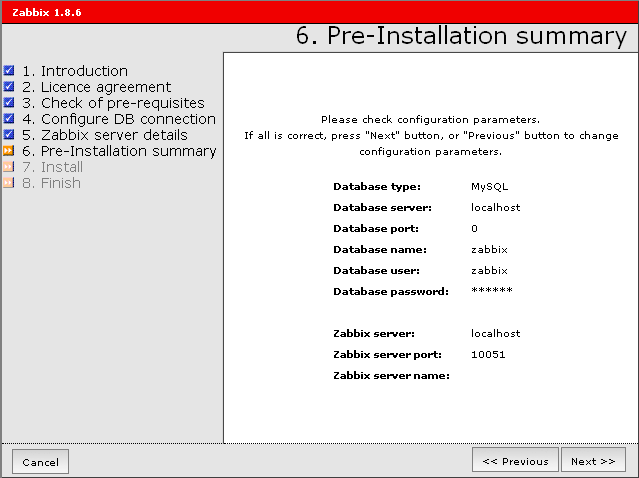
 The next screen shows configuration parameters. Click on Next.
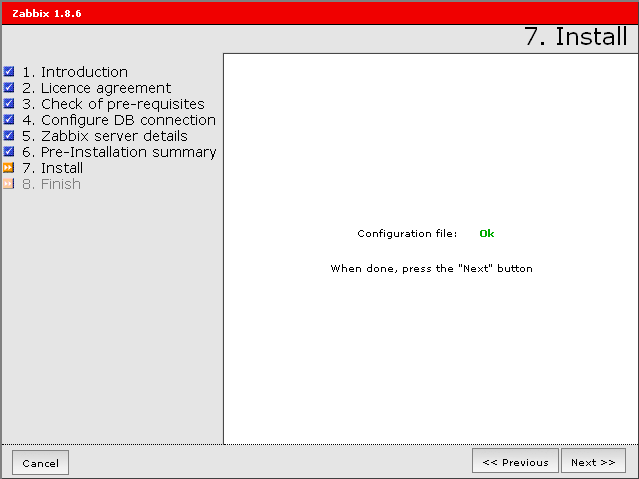
 The next screen shows if the configuration file is OK and install the web
frontend. Click on Next.
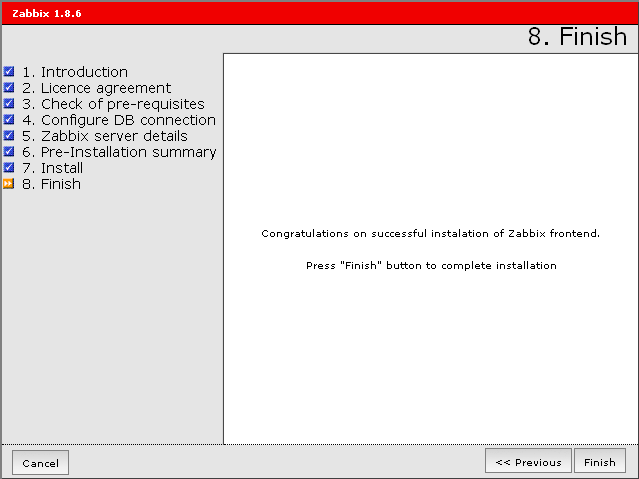
 The next screen shows that the web frontend has been successfully installed.
Click on Finish.
 Navigate your web browser to https://server.test.com/. Click on the link for
Server information - Zabbix and you will get to a login screen. The default
Login name is Admin and the default Password is zabbix. After logging in, you
will be able to change the Login name as well as the password.
5 - View status on website
Navigate your web browser to https://server.test.com/. Click on the link for
Server information - Zabbix. After you login, you will see the main screen
which is a dashboard or summary page.
6 - Service check
Reboot your computer. Log in like normal and check to see that the httpd,
mysqld and zabbix server services are running. That's it, now you have the
Zabbix Server running in Red Hat Enterprise Linux.
# sudo /sbin/shutdown -r now
[sudo] password for user:
# sudo /sbin/service httpd status
[sudo] password for user:
httpd (pid 3404) is running...
# sudo /sbin/service mysqld status
[sudo] password for user:
mysqld (pid 3337) is running...
# sudo /sbin/service zabbix-server status
[sudo] password for user:
zabbix_server_mysql (pid 3513 3510 3508 3505 3503 3500 3498 3496 3493 3491 3489
3487 3485 3483 3481 3479 3477 3476 3475 3474 3473 3472 3471 3470 3468 3467
3416) is running...
Navigate your web browser to https://server.test.com/. Click on the link for
Server information - Zabbix and you will get to a login screen. The default
Login name is Admin and the default Password is zabbix. After logging in, you
will be able to change the Login name as well as the password.
5 - View status on website
Navigate your web browser to https://server.test.com/. Click on the link for
Server information - Zabbix. After you login, you will see the main screen
which is a dashboard or summary page.
6 - Service check
Reboot your computer. Log in like normal and check to see that the httpd,
mysqld and zabbix server services are running. That's it, now you have the
Zabbix Server running in Red Hat Enterprise Linux.
# sudo /sbin/shutdown -r now
[sudo] password for user:
# sudo /sbin/service httpd status
[sudo] password for user:
httpd (pid 3404) is running...
# sudo /sbin/service mysqld status
[sudo] password for user:
mysqld (pid 3337) is running...
# sudo /sbin/service zabbix-server status
[sudo] password for user:
zabbix_server_mysql (pid 3513 3510 3508 3505 3503 3500 3498 3496 3493 3491 3489
3487 3485 3483 3481 3479 3477 3476 3475 3474 3473 3472 3471 3470 3468 3467
3416) is running...
|
