Last modified: Oct. 29, 2010
Contents
1 - Summary
2 - Dependencies
3 - SNMP installation
4 - Service configuration
5 - Snmpget example
6 - Service check
1 - Summary
This guide will show how to install SNMP in Windows. SNMP is a network
protocol used to monitor network devices. This has been tested in Windows 2000,
XP, 2003 and 2008.
2 - Dependencies
The Windows CD will be needed to install the SNMP service.
3 - SNMP installation
Use this process in Windows 2000, XP and 2003. Navigate to the Control Panel,
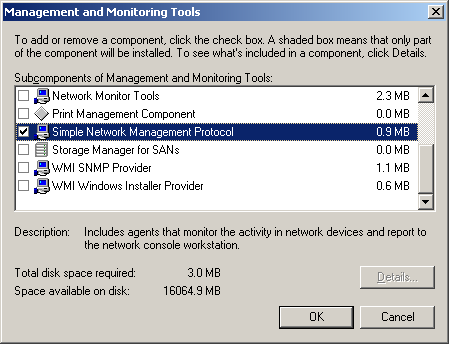
and go to Add/Remove Windows Components. Double-click on the Management and
Monitoring Tools component.
Click the check box next to Simple Network Management Protocol.
 You will be prompted to insert the Windows CD. After the wizard completes
the SNMP service will be installed.
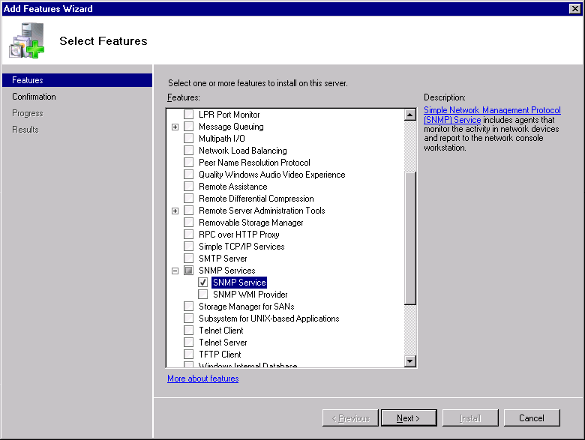
Use this process in Windows 2008. Navigate to the Control Panel, and go to
Administrative Tools. Open Server Manager. Click on Features. On the
right-hand side of the screen, click on Add Features. Expand SNMP Services.
Click the check box next to SNMP Service.
You will be prompted to insert the Windows CD. After the wizard completes
the SNMP service will be installed.
Use this process in Windows 2008. Navigate to the Control Panel, and go to
Administrative Tools. Open Server Manager. Click on Features. On the
right-hand side of the screen, click on Add Features. Expand SNMP Services.
Click the check box next to SNMP Service.
 After the wizard completes the SNMP service will be installed.
4 - Service configuration
Set it so that the SNMP service will start when the system starts up. Open the
services management console by typing the following at the Run button on the
Start Menu.
services.msc
If the two SNMP services are already running stop each of them. Set the SNMP
Service service to have it's startup type to be Automatic and the SNMP Trap
Service service to have it's startup type to be Disabled.
After the wizard completes the SNMP service will be installed.
4 - Service configuration
Set it so that the SNMP service will start when the system starts up. Open the
services management console by typing the following at the Run button on the
Start Menu.
services.msc
If the two SNMP services are already running stop each of them. Set the SNMP
Service service to have it's startup type to be Automatic and the SNMP Trap
Service service to have it's startup type to be Disabled.
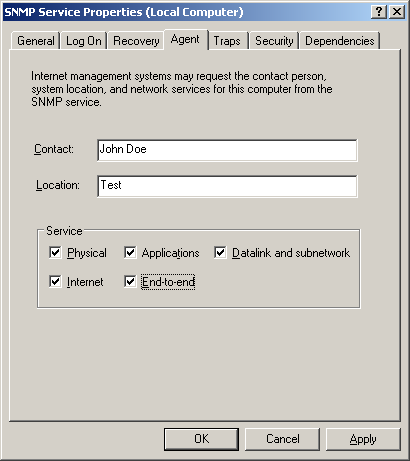
 Double-click on the SNMP Service service and go to the Agent tab. Type in
something in the Contact and Location fields. Also, check all of the Service
boxes below. Click on Apply.
Double-click on the SNMP Service service and go to the Agent tab. Type in
something in the Contact and Location fields. Also, check all of the Service
boxes below. Click on Apply.
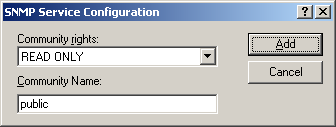
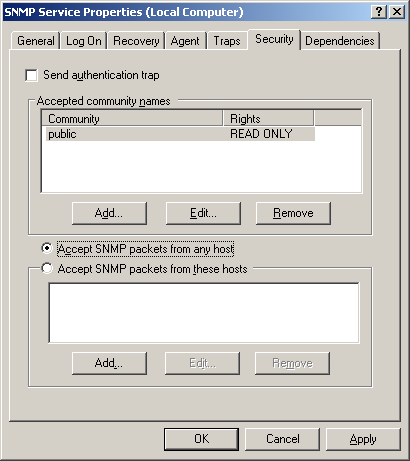
 Click on the Security tab. Uncheck the box that says Send authentication trap.
Under Accepted community names, click on Add. For this example, we will create
a read only community name. Select READ ONLY for the Community rights and type
in public for for the Community Name. Click on Add.
Click on the Security tab. Uncheck the box that says Send authentication trap.
Under Accepted community names, click on Add. For this example, we will create
a read only community name. Select READ ONLY for the Community rights and type
in public for for the Community Name. Click on Add.
 Remove the entry that says localhost under Accept SNMP packets. Click on Accept
packets from any host. Click on Apply and then OK.
Remove the entry that says localhost under Accept SNMP packets. Click on Accept
packets from any host. Click on Apply and then OK.
 Before starting the service, make sure that udp port 161 is open in case you
running firewall software.
Open a command prompt and start the SNMP service.
Before starting the service, make sure that udp port 161 is open in case you
running firewall software.
Open a command prompt and start the SNMP service.
 The service has successfully started.
5 - Snmpget example
If you are running this against a Dell PowerEdge server you can get more
information if you download the MIBs for PowerEdge servers at the Dell
website. You have to go to http://support.dell.com/ and go under the Systems
Management section. Download the file that says MIBs for PowerEdge. The MIB
files will need to be moved to the computer that is running snmpget. In our
example, we are running snmpget from a FreeBSD computer. Find where MIB files
are stored and copy the files to that directory. Afterwards, run snmpget.
# pkg_info -L net-snmp-* | grep /mibs/
/usr/local/share/snmp/mibs/AGENTX-MIB.txt
...
# sudo chown root:wheel ~/dell_mib/mibs63/*
Password:
# sudo cp ~/dell_mib/mibs63/* /usr/local/share/snmp/mibs/
Password:
From another computer, run snmpget to view some SNMP information.
# sudo snmpget -Os -c public -v 2c server.test.com sysName.0 sysLocation.0 sysContact.0
Password:
sysName.0 = STRING: SERVER
sysLocation.0 = STRING: Test
sysContact.0 = STRING: John Doe
6 - Service check
Reboot your computer. Log in like normal and check to see that the SNMP service
is running. Open a command prompt and check to make sure that the SNMP service
has started.
The service has successfully started.
5 - Snmpget example
If you are running this against a Dell PowerEdge server you can get more
information if you download the MIBs for PowerEdge servers at the Dell
website. You have to go to http://support.dell.com/ and go under the Systems
Management section. Download the file that says MIBs for PowerEdge. The MIB
files will need to be moved to the computer that is running snmpget. In our
example, we are running snmpget from a FreeBSD computer. Find where MIB files
are stored and copy the files to that directory. Afterwards, run snmpget.
# pkg_info -L net-snmp-* | grep /mibs/
/usr/local/share/snmp/mibs/AGENTX-MIB.txt
...
# sudo chown root:wheel ~/dell_mib/mibs63/*
Password:
# sudo cp ~/dell_mib/mibs63/* /usr/local/share/snmp/mibs/
Password:
From another computer, run snmpget to view some SNMP information.
# sudo snmpget -Os -c public -v 2c server.test.com sysName.0 sysLocation.0 sysContact.0
Password:
sysName.0 = STRING: SERVER
sysLocation.0 = STRING: Test
sysContact.0 = STRING: John Doe
6 - Service check
Reboot your computer. Log in like normal and check to see that the SNMP service
is running. Open a command prompt and check to make sure that the SNMP service
has started.
 That's it, now you have SNMP running on Windows.
|
